Discover latest Indian Blogs

Tuesday 30 October 2018

Springy Spider


Kids enjoy all kinds of pranks. This freaky spider prop would be a great toy to make and play with as well.
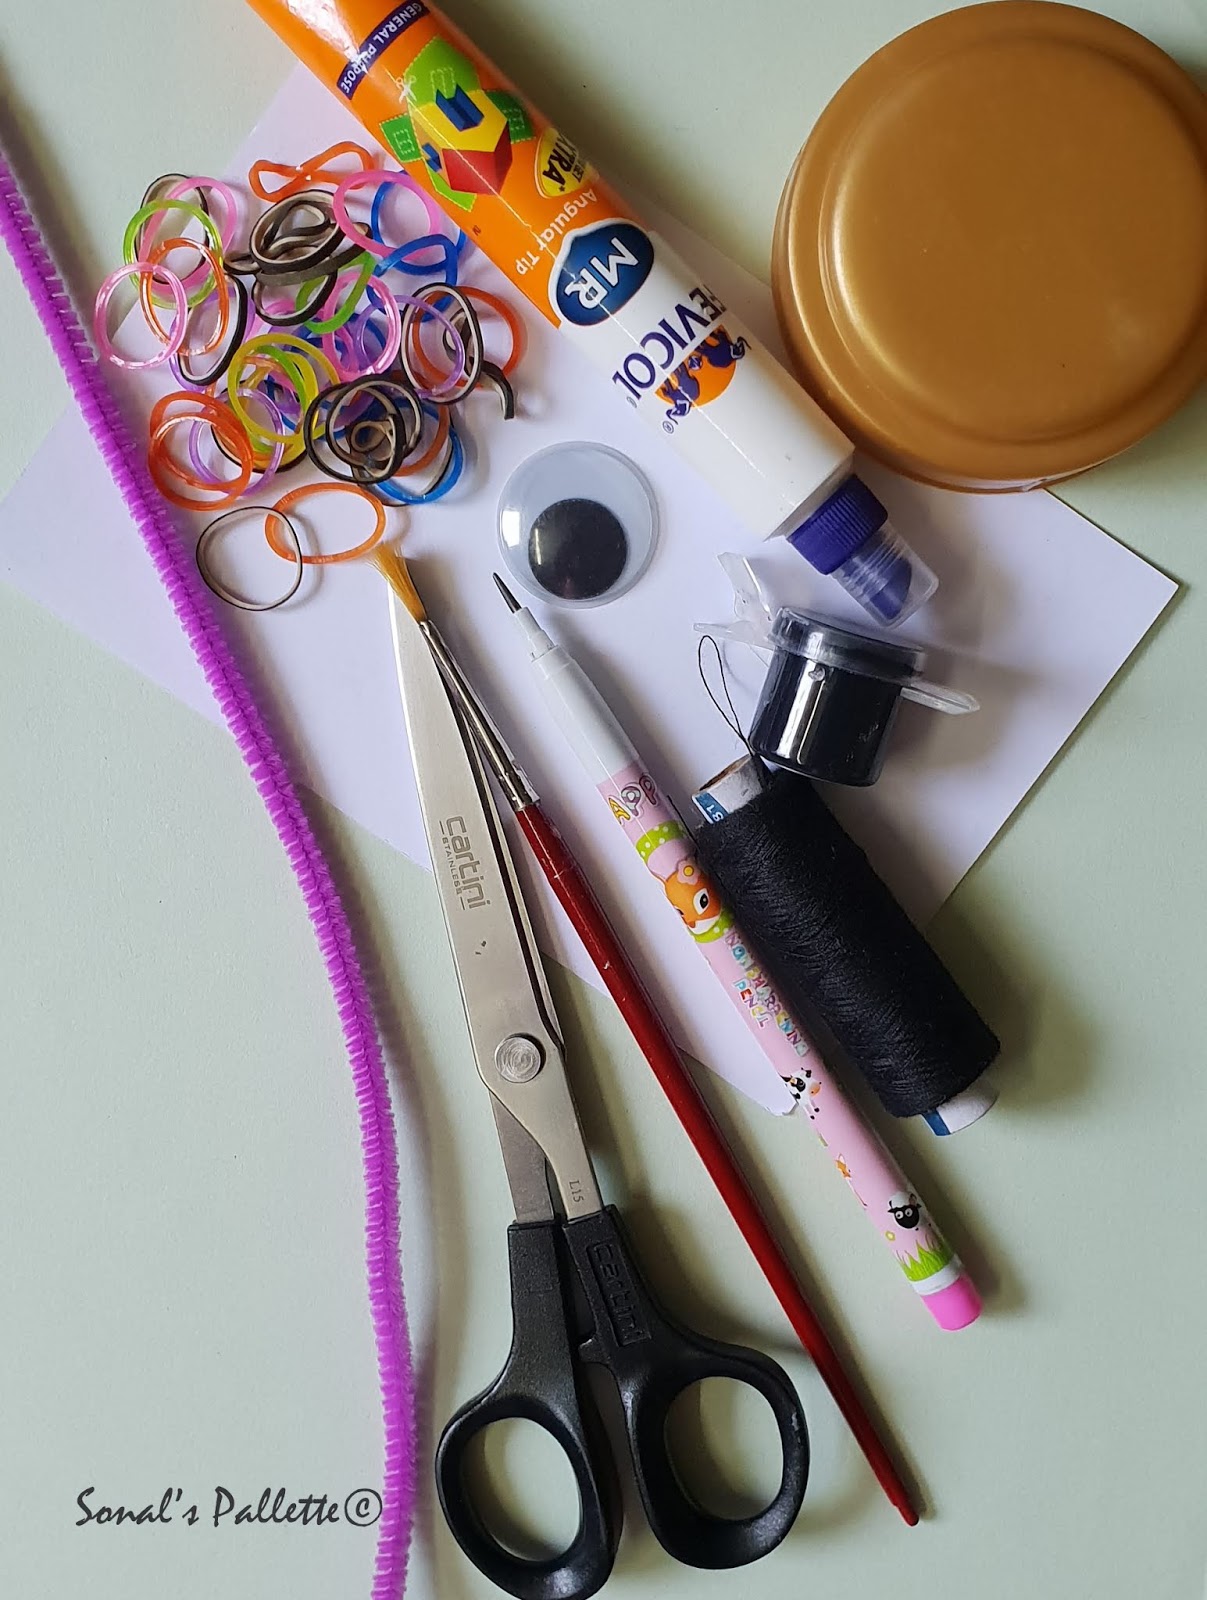
Things required:

1. Plain paper (slightly thick)
2. Black paint / sketch pen
3. Brush
4. Goggly eye
5. Some rubber band
6. Craft Pipe cleaner (optional)
7. A pair of scissors
8. Glue
9. Black thread
First draw a circle with the help of a circular object on the plain paper and cut.
Also cut out 6 strips to make the legs.
Paint all of these black. You can use brush pen as well.


Stick the goggly eyes on the circle.
Just to give it a weird look, I have used one large and one small goggly eye. Set it aside to dry and cut a few rubberbands in small pieces, like this,
For the moustache, make about 15 to 20 loops with the black thread and tie it in the center.
Cut the loops to give it a bushy look.
Now take the 6 paper strips and fold it like this to make the legs of the spider.
(You can use the pipe cleaner to make the legs instead of the paper strip.)
After this, we need to pierce two holes in the body of the springy spider so that we can insert the thread in it.
Let's stick the legs and the moustache on it.
We can use sticky tape to fix the legs in place. Apply glue near the goggly eyes and paste the moustache.
Insert the thread into the holes made previously and tie a knot on the inner side. Drop some glue drops on the body of the spider and sprinkle the rubber band pieces. Let it stay for a while.
When its dry, just flip it so that the unstuck rubber band pieces fall off. Tie the other end of the black thread on a paper stick or a wick, whichever is available.
The springy spider is ready to jump!


In the office, sitting quietly


Sunday 28 October 2018

Rangoli Diya - DIY Diwali Decor


Cleaning and decorating the home forms an integral part of the Diwali ritual. Living in the apartment, I learnt that it was very difficult to make a rangoli and make it stay too. Hours of patient labour just gets wiped out within minutes by excited children running around or a misplaced footstep! Hence, this year I will try out this unique way of putting rangoli on my doorstep.

Things required:-

1. Cardboard sheet
2. Old fancy bangle
3. Rangoli colours / Glitter
4. Sequins 
5. Glue
6. A pair of scissors
7. Pencil
8. Small candle


First take the cardboard and draw the outline of the bangle leaving enough space all around to fit in more design.

I am marking the size of the candle within the bangle's outline as I will fill up the rest of the place with colour.
Make a rangoli design of your choice around the marked area. My daughter helped me draw this one.
Let's cut out this design carefully leaving some margin around.
The first thing that we should do is, fix the bangle in place. It will help in demarcating the space where the rangoli can be made. Apply some glue on the outline of the larger circle and place the bangle on it firmly.

Let it sit for a while.
Apply some glue evenly on the inside leaving out the space reserved for the candle.
Sprinkle some ragoli color carefully on the glue and let it dry.
I have used some glitter powder to give it a festive look.

Fill in the desired rangoli colours on the rest of the design.
It requires a little patience and careful handling but the end result is really worth the try.
 We can use an ice cream stick to level the colour.
After filling up the pattern, apply some glue on the edges and stick the sequins.
I have used these golden beads to make an outline.
Let's now make the candle holder, that is the bangle, a little more attractive by sticking some sequins on its edge. Apply glue around the edge of the bangle and gently place the sequins on it one by one, like this - 
I have again used some golden beads to complete the look. Since it's a portable piece, we need to make sure that the candle remains in place. So apply some glue in the center and spread it well.
Place the candle on it and leave it to dry.
Decorate and light up your home by making this dazzling rangoli diya! 

Have a blissful Diwali.


The video link: https://youtu.be/6pfGtT6hFvQ
#DiwaliDecor


Thursday 18 October 2018

DIY Fabric Flower (1)

The simplest way of converting a Plain dame frock into a Glamorous Party Wear is to adorn it with some fabric flowers!

I had stitched a frock for my daughter but somehow it wasn't looking perfect for the festive occasion that it was meant for. Now due to lack of time, I couldn't go out and shop for embellishments. I had some leftover fabric and a few show buttons at hand. So, I decided to make the most of it.

To make this type of fabric flower doesn't require a lot of effort. 

Things required : - 

1. Some fabric - like satin or cotton
2. Thread - matching with the fabric
3. Show buttons/ Sequins
4. Needle
5. A pair of scissors
6. Lighter / or a candle and matchbox can do as well


 First cut the fabric in small squares. I have taken a 2" square. For each flower, the required number of petals are 5 or 6.


Cut out a curve on one side like this,

In order to make sure that the threads don't come out, we need to heat seal the edges of the petals. To do that, just run the edges over the flame. Make sure you do it in a swift movement and only the edge of the fabric touches the flame. Run you fingers to check the fringes. If still soft then it's not been sealed. If the fringes feel a little thick then the fibers are not loose and the petal is ready to be used.


Once all the petals are done, bind them together using the running stitch on the straight end. Pull the thread to form the frills. 


Now attach the last petal with the first one to form the loop. Add a show button in the center to complete the flower.


These fabric flowers can be now used to transform the otherwise plain looking frock into an adorable party wear dress! 

Check out the different arrangements


You can also use an old necklace for floridity and enjoy the look.